How to Cure Cannabis Buds, The Definitive Guide
Curing cannabis is the final, yet delicate step in achieving the highest possible quality from a harvest. While many growers focus heavily on the cultivation and drying phases, it’s the curing process that elevates the buds by enhancing their potency, flavor, and smoothness. Curing allows for the slow breakdown of residual chlorophyll and sugars, which, if left uncured, can lead to harsh smoke and grassy flavors. This gradual process not only preserves terpenes, the compounds responsible for aroma and taste, but also stabilizes cannabinoids like THC and CBD.

Why Curing is Essential for Cannabis Quality
When done correctly, curing can increase the potency of cannabis by allowing THC to fully develop. Additionally, it prevents mold and bacterial growth by evenly distributing remaining moisture within the buds. In short, curing transforms raw, freshly dried cannabis into a smoother, more flavorful product with an enhanced shelf life. Without proper curing, even the most carefully cultivated and dried cannabis can fail to reach its full potential.
What is Curing and Why is It Important?
Curing is the process of slowly removing the remaining moisture from cannabis buds after they have been dried. Unlike drying, which removes most of the surface moisture, curing works on the moisture still trapped within the flower.
The curing process also preserves the delicate terpenes. Terpenes are highly volatile compounds responsible for the plant’s aroma. Without proper curing, terpenes degrade, leading to a less flavorful experience. Additionally, cannabinoids like THC and CBD continue to mature during curing, enhancing the overall potency of the buds. By curing cannabis, growers can ensure a smoother, more aromatic, and longer-lasting final product.
The Science Behind Curing Cannabis
Curing is more than just a process of drying cannabis slowly, it’s a biochemical transformation. As cannabis cures, residual chlorophyll begins to break down, eliminating the “green” or grassy taste that uncured buds can have. Sugars and starches, which can make smoke harsh, are also degraded. This breakdown improves both the flavor and smoothness of the final product.
Best Conditions for Curing Cannabis
Curing cannabis requires precise environmental control to achieve the best results. The ideal curing environment is a dark, cool place with minimal air circulation, as excess light, heat, or airflow can degrade terpenes and cannabinoids. The temperature should be maintained between 18-21°C (65-70°F) to prevent excessive drying, while relative humidity should be kept between 55-65%. This humidity level allows moisture to leave the buds slowly without causing mold or mildew.
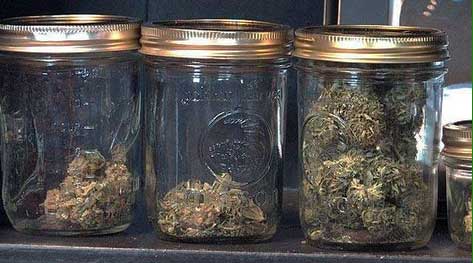
Sealed glass jars are the preferred storage containers for curing because they help regulate humidity and protect the buds from light exposure. Plastic containers are discouraged, as they can affect the flavor and contribute to moisture retention issues. Ensuring that your environment meets these conditions will preserve the integrity of the terpenes, cannabinoids, and overall bud quality.
Step-by-Step Guide to Curing Cannabis
The right steps to cure marijuana buds are simple to follow, but sometimes we can be lost somehow. Here you can find an easy-to-follow guide to achieve success in this delicate task.

1. Preparing the Buds
Before beginning the curing process, it’s essential that your buds are properly dried. Buds that feel dry to the touch, but still contain internal moisture, are ideal for curing. To check, gently bend a small stem—if it snaps cleanly, the buds are ready for curing. If it bends without snapping, allow more drying time to prevent mold during curing.
2. Selecting the Containers
Glass jars are the gold standard for curing cannabis. Their airtight seal maintains a stable humidity level, while protecting buds from outside contaminants and excess air. Avoid plastic containers, as they can negatively impact the flavor and may promote excess moisture retention, leading to mold growth.
3. Filling the Jars
When filling the jars, it’s important to loosely pack the buds. Overpacking restricts airflow and creates the risk of mold. Leave about 25% of the jar empty to allow enough air circulation inside the jar while maintaining an airtight seal.
4. Sealing and Storing the Jars
After filling the jars, seal them and store them in a dark place with stable humidity and temperature, as previously outlined. Jars should be kept out of direct light to prevent cannabinoid degradation. Ensure you are maintaining the ideal humidity range of 55-65% to allow for a slow, even cure.
5. Burping the Jars
For the first two weeks of curing, it is essential to “burp” the jars. This involves opening the jars for a few minutes once or twice daily to release any built-up moisture and replenish oxygen. Burping helps prevent mold and promotes even drying. After the initial two weeks, you can reduce burping to once every few days.
6. Monitoring for Mold
Throughout the curing process, regularly inspect the buds for any signs of mold or mildew. If you notice an off smell or see white/gray patches, remove the affected buds immediately and reassess the humidity levels inside the jars. Using humidity packs can help maintain the optimal environment and prevent mold.

How Long Should the Curing Process Last?
The curing process typically takes anywhere from 2 weeks to 6 months, depending on the desired quality and flavor development. For most growers, a minimum curing time of 2-3 weeks is recommended, as this allows enough time for the breakdown of chlorophyll and the enhancement of terpenes and cannabinoids.
For those seeking optimal flavor and smoothness, a longer curing period—between 4 to 8 weeks—can result in a noticeably better product. Some connoisseurs prefer curing their buds for 6 months or even longer, as this extended time allows the full complexity of the cannabis to emerge. However, be careful not to extend the cure beyond the point where moisture is fully gone, as the buds can become too dry and brittle over time.
Ultimately, the right curing time depends on your personal preference. While some may enjoy a shorter cure for a fresher taste, others will appreciate the depth and smoothness that comes from a longer cure.
Common Mistakes to Avoid During Curing
Curing is a delicate process that requires attention to detail, and several common mistakes can negatively affect the final product. Here are some key pitfalls to avoid:
1. Curing Buds That Are Too Wet
If buds haven’t dried enough before entering the curing stage, excess moisture can lead to mold or mildew development inside the jars. Always ensure the buds are properly dried, with stems snapping instead of bending.
2. Over-Packing the Jars
Packing jars too tightly restricts airflow, increasing the risk of mold growth and uneven curing. Buds need space to breathe, so leave around 25% of the jar empty.
3. Inconsistent Burping or Air Circulation
Neglecting to burp the jars, especially during the first two weeks, can trap moisture inside, causing buds to become too damp. Burping allows excess moisture to escape, ensuring an even cure and preventing mold.
4. Storing in Poor Conditions
Improper storage conditions such as high humidity, exposure to light, or fluctuating temperatures can degrade cannabinoids and terpenes. Always store jars in a cool, dark place to maintain the quality of your cannabis.
By avoiding these common mistakes, you’ll be able to preserve the full potential of your harvest and ensure a smooth, flavorful final product.
Signs of a Well-Cured Bud
A well-cured cannabis bud can be recognized by several key characteristics, all of which contribute to the quality of the final product. Here’s what to look for when determining if your buds have been properly cured:
1. Smooth Smoke
One of the first indicators of a well-cured bud is how smooth it is when smoked. Harshness is often a sign of incomplete curing, as residual chlorophyll and sugars haven’t broken down fully.
2. Rich Aroma and Flavor
Properly cured buds should have a strong, pleasant aroma, as terpenes are preserved. The flavor should also be rich and pronounced, without any “green” or grassy taste.
3. Optimal Moisture Levels
The buds should feel dry to the touch but not brittle. When squeezed, they should give a slight resistance before breaking apart. The internal moisture will have been distributed evenly, ensuring a consistent burn without crumbling to dust.
4. Potency
Well-cured cannabis should exhibit the full potency of its cannabinoids, particularly THC and CBD. The curing process allows these compounds to stabilize, resulting in a more potent and longer-lasting effect.
By recognizing these signs, you can be confident that your cannabis has been properly cured, leading to a more enjoyable and effective experience.
Products to enhance the curing process
Curing is an easy to do process, but needs patiente and be methodical, also can be enhanced using the righ tools, like the ones we offer to you.
Manicure Scissors
These manicure scissors are the perfect tool for easy and precise plant trimming. With a fine, straight or curved tip, they offer excellent control for detailed work, making them an ideal ally for cleaning and manicuring your buds with precision and ease.
Perforated Drying Rack
The perforated drying rack is an excellent solution for drying harvested flowers. With its large storage capacity and optimal airflow, it ensures an even and efficient drying process, making it a must-have for growers looking to maximize their post-harvest results.
The Bowl Tumble Bud Peeler
The Bowl Tumble bud peeler is the ideal manual companion for growers seeking an effortless trimming experience. This machine cleans your buds in just seconds, operating silently without the need for electricity. Known as the “salad bowl,” it delivers a perfect peel with just a few turns of the handle, making it both efficient and relaxing for growers who want to save time while achieving great results.
Boveda
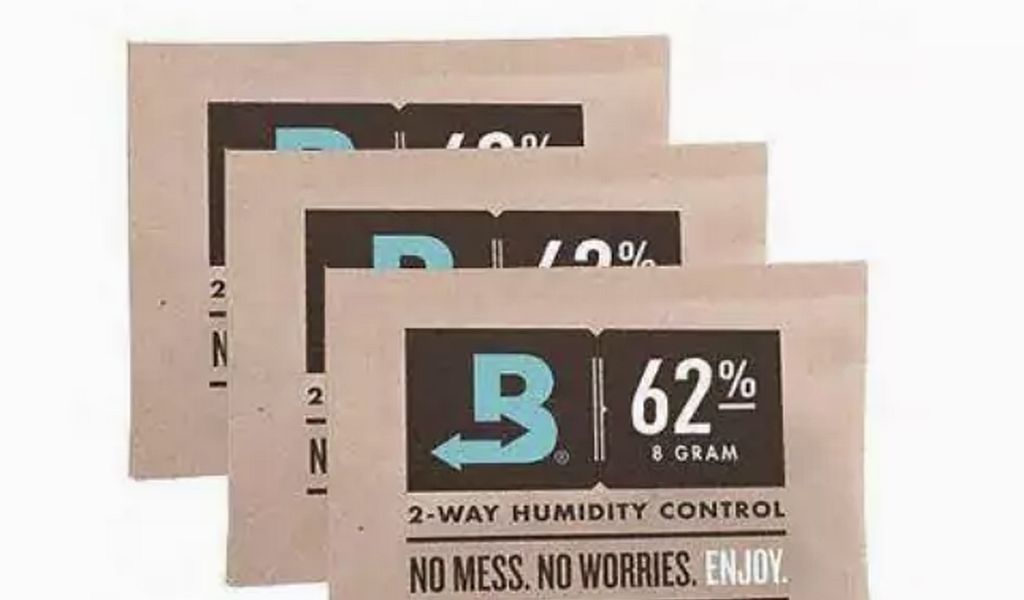
Boveda curing envelopes are designed to maintain the precise humidity levels needed for an ideal curing process. These envelopes are available in two humidity ranges, 58% and 62%, allowing you to choose the right level depending on your flower quantity. Boveda ensures consistent humidity control, preventing overdrying or moisture retention, giving your flowers the perfect final touch for a smooth, flavorful, and well-preserved result.
Final notes
Properly curing cannabis buds is a critical step in the post-harvest process, and it plays a significant role in determining the overall quality of your final product. When done correctly, curing preserves the full potency of cannabinoids, enhances the flavor and aroma by protecting terpenes, and ensures a smoother, more enjoyable smoke.
By following the right techniques and avoiding common mistakes, it is possible to maximize the potential of the strain, leading to a top quality product that offers better potency, flavor, and shelf life. Remember, patience is key. Take the time to cure properly, and the results will speak for themselves.
I hope you’ve enjoyed this article about how to cure marijuana buds properly, remember to visit the previous articles of the harvesting trilogy, when to cut cannabis plants, and how to dry marijuana, also follow us in our newsletter and social networks.
Founder of Experiencia Natural, creative and entrepreneur, designer, master in grower and marketing. For a normalization of all plants and substances, giving priority to patients and users.


